Spider plants, with their cascading foliage and vibrant green hues, are popular houseplants known for their resilience and ease of care. This comprehensive guide will walk you through everything you need to know to nurture your spider plant, from optimal light conditions and watering techniques to propagation methods and pest control. Discover the secrets to keeping your spider plant healthy and thriving.
This guide covers the essentials for cultivating healthy spider plants. We’ll explore various aspects, from fundamental care practices to advanced techniques for propagating new plants and addressing common problems. From the ideal light exposure to the correct watering schedule, this detailed approach will ensure your spider plant thrives in your home environment.
Introduction to Spider Plants
Spider plants, a popular houseplant, are known for their air-purifying qualities and easy care. These vibrant green foliage plants are readily available and adaptable to various indoor environments. Their unique growth patterns and propagation abilities make them fascinating additions to any home or office space.Spider plants, scientifically classified asChlorophytum comosum*, belong to the Asparagaceae family. They are known by several common names, including airplane plant, ribbon plant, and spider ivy.
This diverse nomenclature reflects the plant’s widespread appeal and recognition.
Typical Appearance and Growth Habits
Spider plants exhibit a characteristic appearance. Their elongated, sword-like leaves emerge from a central point and extend outward, often cascading downward. The leaves are typically a vibrant green, though variegated forms with stripes of white, cream, or yellow are also common. As the plant matures, it produces “spiderettes” or “pups” – small plantlets that grow on long stems emerging from the main plant.
These “spiderettes” can be separated and rooted to propagate new plants. This prolific growth habit makes spider plants easy to multiply. The plant’s overall form can be described as cascading or spreading, depending on the growing conditions.
Origins and Geographical Distribution
Spider plants originate from South Africa. Their adaptability has allowed them to spread to various parts of the world, becoming a common houseplant in many cultures. Their widespread presence in gardens and homes across continents reflects their resilience and ability to thrive in diverse environments.
Symbolic Meanings and Cultural Significance
Spider plants have a rich cultural significance in some parts of the world, particularly in Asia. They are often associated with good luck and prosperity, symbolizing growth and abundance. Their ability to propagate and produce new plants aligns with these beliefs. The symbolism associated with spider plants varies across different cultures, reflecting the diverse perceptions and interpretations.
History of Spider Plant Cultivation
Spider plants were introduced into cultivation in the 19th century. Their popularity grew steadily throughout the 20th century due to their easy care and adaptability to indoor environments. Their visual appeal and propagation capabilities have made them popular additions to homes and offices, with numerous cultivars developed for their unique leaf patterns. The increasing awareness of their air-purifying qualities further bolstered their popularity in recent times.
Light Requirements
Spider plants, with their elegant foliage and resilience, thrive under the right light conditions. Proper light exposure significantly impacts their growth, health, and overall appearance. Understanding the optimal light requirements for these plants ensures a healthy and vibrant specimen.Spider plants are adaptable but prefer bright, indirect light. Direct sunlight can scorch their leaves, while insufficient light can hinder their growth and reduce the production of “spiderettes” (baby plants).
Finding the right balance is key to maintaining a thriving spider plant.
Optimal Light Conditions
Spider plants flourish in environments with bright, indirect light. This means they benefit from light that filters through a window or other covering, preventing direct sun exposure. The intensity of the light should be moderate to avoid scorching. A location near an east-facing window or a spot under a bright but diffused light source is ideal.
Signs of Insufficient Light
Insufficient light can manifest in several ways, affecting the overall health and appearance of the spider plant. Leaves may appear elongated and pale green, indicating a lack of chlorophyll production. Growth may be stunted, and the plant may exhibit a lack of vibrant color. Additionally, the production of spiderettes (baby plants) might decrease or cease altogether.
Signs of Excessive Light
Excessive light, particularly direct sunlight, can cause leaf burn. This is often noticeable as brown or yellow spots on the leaves. The leaves might also exhibit crisp or dry edges, indicating dehydration caused by intense light exposure. Extreme cases may result in the plant’s demise.
Positioning for Optimal Light
To ensure optimal light conditions, position your spider plant near a window that receives indirect sunlight. Avoid direct exposure to the midday sun. Consider using sheer curtains or blinds to diffuse the light. Regularly monitor the plant’s response to the light and adjust its position as needed.
Light Source Comparison
| Light Source | Impact on Spider Plant Health |
|---|---|
| Direct Sunlight | Can cause leaf burn, leading to brown or yellow spots and crispy edges. May inhibit growth and reduce spiderette production. |
| Indirect Sunlight | Ideal for spider plants, promoting healthy growth and vibrant foliage. Promotes spiderette production. |
| Artificial Light | Fluorescent and LED lights can be used as supplemental or primary light sources. Ensure sufficient intensity and duration to avoid stunted growth or leaf issues. Proper placement is crucial. |
Watering Techniques
Proper watering is crucial for the health and vitality of spider plants. Consistent moisture levels, avoiding both overwatering and underwatering, are essential for their thriving. Understanding the appropriate watering schedule and methods, along with recognizing the signs of overwatering and underwatering, are key to maintaining a healthy spider plant.Watering frequency varies greatly depending on environmental factors such as temperature, humidity, and the pot’s drainage.
Spider plants, like most houseplants, thrive in a slightly moist environment. However, they are susceptible to root rot if overwatered. Therefore, careful observation and adaptation of watering practices are essential.
Watering Schedule Considerations
Watering schedules for spider plants should be adjusted based on seasonal changes and environmental conditions. During warmer months, the soil will dry out faster, requiring more frequent watering. Conversely, cooler months often necessitate less frequent watering. The pot’s size and drainage also play a significant role. A larger pot will hold more water, requiring more time to dry out.
Good drainage is crucial to prevent waterlogging.
Signs of Overwatering and Underwatering
Recognizing the signs of overwatering and underwatering is vital for maintaining optimal plant health. Overwatering can lead to yellowing or drooping leaves, root rot, and a musty odor emanating from the soil. Underwatered plants often display wilting, dryness, and browning of the leaves. Inspecting the soil moisture is the best way to determine if your spider plant needs water.
Feel the soil a few inches below the surface. If it feels dry, it’s time to water.
Ideal Watering Methods
Employing the correct watering methods is key to ensuring your spider plant receives the right amount of water. A watering can, with its controlled water flow, allows for precise watering. Using a watering can also helps to loosen the soil around the plant’s roots, promoting healthy root growth. A self-watering pot system can also be a practical option, providing a consistent level of moisture, eliminating the need for frequent checks.
However, make sure the system is properly maintained to prevent overwatering. Ensure the pot has drainage holes to avoid water accumulation.
Preventing Root Rot
Root rot is a significant threat to spider plants, stemming from excessive moisture. To prevent root rot, ensure the pot has adequate drainage holes. Properly draining the excess water after watering is also essential. Avoid overwatering, and allow the soil to dry out slightly between waterings.
Comparison of Watering Methods
| Watering Method | Effectiveness | Pros | Cons |
|---|---|---|---|
| Watering Can | High | Precise control, good soil aeration | Requires consistent monitoring |
| Self-Watering Pot | Moderate | Automated watering, consistent moisture | Potential for overwatering, system maintenance needed |
The effectiveness of each method is influenced by the user’s diligence in monitoring the plant’s needs. Careful observation and adjustment are crucial for successful watering.
Soil Composition and Potting

Spider plants thrive in well-draining soil that allows for proper aeration and root development. Choosing the right potting mix and pot size is crucial for maintaining healthy plants. Proper potting techniques ensure the roots have the necessary space and nutrients to flourish, preventing issues like root rot. Repotting, performed at the appropriate time, allows for fresh soil and adjusted pot size as the plant grows.The ideal soil composition for spider plants promotes both drainage and aeration.
A good balance of these properties is vital to prevent waterlogging, which can lead to root rot, a common problem for these plants. The correct potting mix and pot size will contribute to the overall health and growth of the spider plant.
Ideal Soil Mix
Spider plants appreciate a well-draining potting mix that allows excess water to escape easily. A mixture of peat moss, perlite, and potting soil works well. Peat moss retains moisture while perlite improves drainage and aeration. A suitable ratio for this mix is approximately 1:1:1. This blend allows the roots to breathe while still maintaining some moisture.
Potting Techniques
Proper potting techniques are essential for the success of spider plants. The selection of the right pot size is important, as is ensuring adequate drainage. A pot that is too large may retain excess water, potentially leading to root rot. Conversely, a pot that is too small may restrict root growth and hinder the plant’s development.
Pot Size Selection
Choose a pot that is slightly larger than the plant’s current root ball. This allows for continued growth without overcrowding. Using a pot that is too large can result in waterlogged soil. Using a pot that is too small can hinder growth. A pot with drainage holes is crucial for preventing water accumulation and root rot.
Consider the size of the plant’s root system when selecting the pot.
Drainage Holes
Drainage holes are essential for preventing waterlogging. Water that sits in the pot can lead to root rot, a significant threat to the health of spider plants. Always ensure the pot you select has sufficient drainage holes to allow for proper water drainage.
Repotting Spider Plants
Repotting spider plants is an important part of their care. Repotting is generally recommended every 1-2 years, or when the roots become crowded in the current pot. This ensures that the plant has the space and nutrients needed to continue growing.
Steps for Repotting
- Carefully remove the spider plant from its current pot.
- Gently loosen the roots, removing any circling roots or roots that are bound tightly to the pot.
- Prepare a new pot with fresh potting mix, ensuring it is well-draining.
- Place the plant in the new pot and fill in the gaps with fresh potting mix, ensuring the soil level is consistent with the previous pot.
- Water the plant thoroughly after repotting.
Importance of Well-Draining Potting Mix
Using a well-draining potting mix is crucial for preventing root rot. Root rot occurs when the roots are consistently exposed to waterlogged conditions. A well-draining potting mix ensures that excess water is quickly removed, allowing the roots to breathe and preventing this issue.
Comparison of Soil Types
| Soil Type | Drainage | Aeration | Suitability for Spider Plants |
|---|---|---|---|
| Potting Soil | Moderate | Moderate | Good, but needs amendment with perlite or similar material for better drainage |
| Peat Moss | Poor | Moderate | Needs amendment for better drainage and aeration; suitable for moisture retention |
| Perlite | Excellent | Excellent | Excellent for drainage and aeration; needs amendment with other components for moisture retention |
| Coco Coir | Good | Good | Good, with excellent water retention and aeration |
Temperature and Humidity
Spider plants, with their elegant foliage and resilience, are popular houseplants. Understanding their temperature and humidity preferences is crucial for their healthy growth and vibrant appearance. Maintaining these conditions can lead to a thriving plant that adds a touch of nature to any interior space.Maintaining the ideal temperature and humidity levels for spider plants ensures their overall health and vigor.
This contributes to the production of new offsets, the vibrant green color of the leaves, and the plant’s overall vitality. Maintaining optimal conditions promotes the natural growth cycles of the plant.
Ideal Temperature Range
Spider plants thrive within a specific temperature range. They prefer temperatures between 65°F and 85°F (18°C and 29°C). This range provides the ideal environment for optimal growth and development. Temperatures outside this range can impact the plant’s health.
Effects of Extreme Temperatures
Extreme temperatures can significantly affect spider plants. Exposure to temperatures below 50°F (10°C) can cause the leaves to yellow or brown, potentially leading to damage and even death. Conversely, excessively high temperatures above 90°F (32°C) can lead to wilting and reduced growth. Prolonged exposure to such conditions can result in significant stress on the plant.
Preferred Humidity Levels
Spider plants generally prefer moderate humidity levels. While they can tolerate lower humidity, higher humidity levels contribute to their overall well-being. They do not require extremely high humidity levels, and excessive humidity can lead to fungal issues. Maintaining moderate humidity levels helps maintain the overall health and appearance of the plant.
Adjusting the Environment for Optimal Humidity
Increasing humidity can be achieved through various methods. Placing the plant on a tray filled with pebbles and water (ensure the pot’s base isn’t submerged) can elevate the humidity around the plant. Grouping plants together can also create a microclimate of higher humidity. Regular misting, particularly during dry periods, can also help maintain humidity levels.
Tolerance Levels
Spider plants exhibit a relatively good tolerance to a range of temperatures and humidity levels. They are adaptable and can adjust to moderate variations in these conditions. However, prolonged exposure to extreme conditions can negatively impact their growth and health. This adaptability makes them relatively easy to care for in most homes, but maintaining the ideal conditions will ensure the best possible outcomes.
Fertilizing Spider Plants

Spider plants, with their elegant foliage and ease of care, are popular houseplants. Proper fertilization is key to maintaining their vibrant green color and promoting healthy growth. This section will detail the essential aspects of fertilizing spider plants, ensuring you provide the optimal nutrients for their thriving.
Importance of Fertilizing
Spider plants, like other plants, require essential nutrients for healthy growth. Fertilizing provides these vital nutrients, promoting robust leaf development, preventing nutrient deficiencies, and encouraging the production of new “spiderettes” (baby plants). Without adequate fertilization, spider plants may exhibit signs of stunted growth, pale leaves, and reduced vigor.
Frequency of Fertilization
For optimal growth, fertilize spider plants during their active growing season, typically spring and summer. Apply a diluted liquid fertilizer every 2-4 weeks during these periods. Reduce or stop fertilizing during the dormant period (fall and winter) to allow the plant to conserve energy. Observe the plant’s health; if it shows signs of stress or yellowing leaves, reduce or stop fertilizing immediately.
Suitable Types of Fertilizer
A balanced liquid fertilizer formulated for houseplants is ideal. Look for a fertilizer with an NPK ratio (nitrogen, phosphorus, and potassium) that is balanced, such as 10-10-10. Specialized fertilizers designed for foliage plants are also suitable options. Avoid using fertilizers with high nitrogen content, as this can lead to excessive foliage growth at the expense of root development and flowering.
Application Methods
Dilute the fertilizer according to the manufacturer’s instructions. Apply the diluted fertilizer to the soil around the base of the plant, avoiding contact with the leaves. Water the plant thoroughly after fertilizing to ensure even distribution of the nutrients. Apply the fertilizer directly to the soil to avoid leaf burn, ensuring that the fertilizer does not come into contact with the leaves.
Risks of Over-Fertilizing
Over-fertilizing can lead to several problems, including leaf burn, nutrient toxicity, and root damage. Signs of over-fertilization include yellowing or browning leaf tips, leaf drop, and stunted growth. Avoid over-fertilizing by following the recommended dilution instructions and reducing the frequency during periods of slow growth.
Comparison of Different Fertilizers
Different types of fertilizers offer varying nutrient compositions and application methods. While balanced fertilizers are generally suitable, consider specific needs based on the plant’s condition. For example, a fertilizer with a higher phosphorus content might promote flowering, while a higher nitrogen content will result in lush foliage growth. Thorough research on the specific needs of the plant and the properties of different fertilizers is essential for optimal results.
Propagation Methods

Spider plants, with their striking foliage and ease of propagation, are excellent choices for plant enthusiasts seeking to expand their collection. Several effective methods exist for multiplying these popular houseplants, each with its own advantages and considerations. Understanding these techniques allows for successful propagation and the creation of new plants.
Leaf Cutting Propagation
This method leverages individual leaves for propagation, a simple and efficient approach. The leaves, containing dormant buds, can develop into new plants. This technique is particularly useful for rapidly increasing the number of spider plants.
- Gather Materials: You will need sharp, clean pruning shears, a small pot, a well-draining potting mix, and a clear plastic bag (optional). Using clean tools minimizes the risk of introducing diseases. A well-draining potting mix ensures proper aeration and prevents root rot.
- Prepare the Leaf Cuttings: Carefully cut a healthy leaf from the mother plant, ensuring a clean cut. A sharp tool prevents damage to the leaf and promotes quicker healing.
- Planting the Cuttings: Plant the leaf cutting into the potting mix, ensuring the base of the leaf is in contact with the soil. The soil should be consistently moist but not waterlogged. Avoid burying the entire leaf; the top portion should remain exposed.
- Creating a Humid Environment: For quicker root development, place the pot in a plastic bag, creating a mini-greenhouse. This increases humidity and promotes faster growth. Regularly check for moisture and remove the bag if condensation builds up excessively, to avoid fungal issues.
- Maintaining the Cuttings: Keep the soil consistently moist but not soggy. Avoid direct sunlight, which can cause the leaf to dry out. Place the pot in a location with bright, indirect light.
- Patience and Monitoring: Root development may take several weeks or months. Observe the cuttings regularly for signs of new growth or wilting. Adjust the watering and light accordingly.
Division Propagation
This method involves separating the plant into smaller sections containing roots and leaves. This is a quick and straightforward way to multiply spider plants, allowing for immediate growth of new plants.
- Identifying the Right Time: This method is best performed when the spider plant is actively growing and shows multiple offsets (baby plants). These offsets should have their own roots and leaves.
- Separating the Offsets: Gently detach the offsets from the mother plant. Use a sharp, clean knife or scissors to ensure a clean cut. Ensure each division has a sufficient amount of roots for proper establishment.
- Repotting: Plant each division in a separate small pot filled with well-draining potting mix. Ensure the roots are completely covered by the soil.
- Watering and Care: Maintain consistent moisture but avoid overwatering. Provide the divisions with bright, indirect light to promote growth.
- Monitoring Growth: Regular observation is crucial to ensure the new plants are developing properly. Adjust watering and light as needed.
Comparison of Methods
| Method | Efficiency | Success Rate | Ease |
|---|---|---|---|
| Leaf Cutting | Moderate | High (with proper care) | High |
| Division | High | High (with proper care) | Moderate |
Leaf cutting propagation, while potentially slower than division, offers a way to propagate from a single leaf. Division is generally quicker, but it requires a mature plant with offsets. Both methods, when performed correctly, yield high success rates. Consistency in watering, light, and humidity are key to the success of both methods.
Common Pests and Diseases

Maintaining healthy spider plants often involves vigilance against common pests and diseases. Understanding the signs of infestation and implementing appropriate treatment methods are crucial for preventing the spread of problems and ensuring the plant’s well-being. Early detection is key to effective management.
Identifying Common Pests
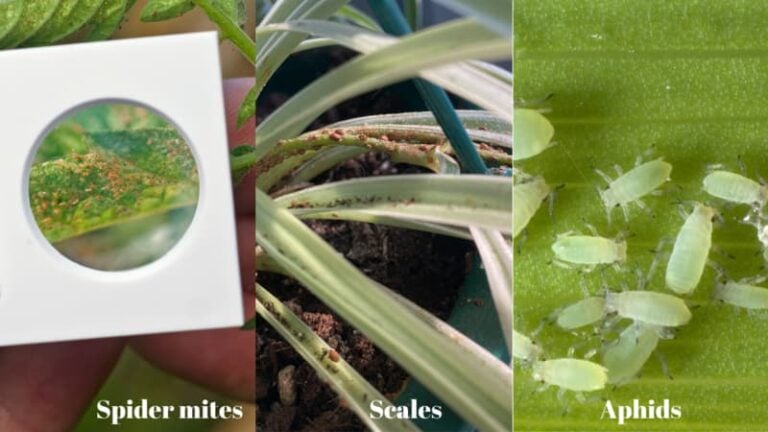
Spider plants, like many houseplants, are susceptible to various pests. Identifying these pests early is essential for effective treatment. Common culprits include spider mites and aphids, which can cause significant damage if left unchecked. Recognizing the specific symptoms of each pest infestation can greatly assist in timely intervention.
Symptoms of Pest Infestations and Diseases
Visible signs of pest infestation often include tiny webs spun by spider mites, which are frequently found on the undersides of leaves. Aphids, small, sap-sucking insects, can appear as clusters on leaves, stems, and new growth. In both cases, the leaves might exhibit discoloration, yellowing, or curling. Leaf drop and stunted growth are also potential signs. Often, diseases manifest as brown or black spots on leaves, or wilting that progresses rapidly.
Treatment Methods for Common Spider Plant Pests
For spider mites, insecticidal soap or neem oil applications are effective. These treatments should be applied thoroughly to all affected areas. For aphids, a gentle stream of water can dislodge them from the plant. Alternatively, insecticidal soap or horticultural oil can be used. It’s essential to follow the product instructions carefully.
For diseases, removing the affected leaves or stems, along with adjusting watering practices to prevent overwatering, may help manage the issue. In severe cases, consulting a local plant specialist is recommended.
Preventative Measures
Regular inspection of your spider plant is key to preventing pest infestations. Maintaining good air circulation around the plant can help minimize the risk of pest buildup. Avoid overcrowding plants, as this can create a humid environment conducive to pest proliferation. Always inspect new plants before introducing them to your collection to prevent the spread of pests.
Proper watering techniques, as discussed earlier, also help to maintain plant health and deter many pests.
Table of Common Pests and Treatment Methods
| Pest | Symptoms | Treatment |
|---|---|---|
| Spider Mites | Tiny webs on undersides of leaves, leaf discoloration, yellowing | Insecticidal soap or neem oil spray, following product instructions. |
| Aphids | Small, sap-sucking insects on leaves, stems, and new growth; leaf distortion, curling | Gentle stream of water to dislodge, insecticidal soap or horticultural oil. |
| Fungal Diseases (e.g., leaf spot) | Brown or black spots on leaves, wilting | Remove affected leaves/stems, adjust watering practices to avoid overwatering. Consult a specialist if necessary. |
Troubleshooting Problems
Maintaining a healthy spider plant involves recognizing and addressing potential issues promptly. A keen eye for common problems and a thoughtful approach to solutions are crucial for ensuring the plant’s vibrant health and longevity. Understanding the underlying causes of these issues allows for effective and targeted interventions.Troubleshooting spider plant problems often involves a systematic approach. Careful observation of the plant’s appearance, combined with an understanding of its environmental needs, can pinpoint the root cause of the problem.
This process allows for precise and effective solutions to be implemented.
Identifying Yellowing Leaves
Yellowing leaves in spider plants are a frequent occurrence, often stemming from environmental factors or improper care. Identifying the precise cause is essential for implementing the correct solution.
- Overwatering: Excessive watering can lead to root rot, which in turn causes yellowing and wilting. Waterlogged soil deprives roots of oxygen, hindering nutrient absorption and causing the plant to exhibit yellowing. Symptoms might include yellowing that starts from the bottom leaves, followed by wilting and eventually, complete leaf drop. Adjust watering frequency to allow the soil to dry out slightly between waterings.
Ensure proper drainage in the pot to prevent waterlogging. Repotting the plant with fresh, well-draining soil may be necessary.
- Underwatering: Insufficient watering can also cause yellowing, typically manifesting as dry, crispy, and brown-edged leaves. Consistent moisture is essential for proper nutrient transport and photosynthesis. Increase watering frequency and ensure the soil is consistently moist, but not waterlogged. Use a finger test to gauge soil moisture.
- Nutrient Deficiency: A lack of essential nutrients can cause yellowing, often exhibiting a specific pattern. For instance, yellowing leaves with green veins might indicate a lack of nitrogen. Consider supplementing with a balanced liquid fertilizer during the growing season. Avoid over-fertilizing, as this can be detrimental to the plant.
Addressing Stunted Growth
Stunted growth in spider plants can arise from various factors, impacting the plant’s overall development. Addressing the specific cause is vital for encouraging healthy growth.
- Insufficient Light: Spider plants require ample light to thrive. Insufficient light can result in slow or no growth. Ensure the plant is placed in a location with adequate indirect light. Move the plant to a brighter spot if necessary.
- Nutrient Deficiency: Inadequate nutrients can hinder growth. Ensure the plant is receiving the appropriate amount of nutrients through regular fertilization, using a balanced liquid fertilizer. Follow the manufacturer’s instructions carefully to avoid over-fertilizing.
- Pot Binding: When the roots fill the pot, they become constrained, hindering the plant’s ability to absorb nutrients and water. This often leads to stunted growth. Repot the plant into a slightly larger pot with fresh potting mix.
Managing Root Rot
Root rot is a serious issue that can lead to the death of the spider plant if not addressed promptly. Recognizing the symptoms and taking swift action are essential for saving the plant.
- Symptoms: Signs of root rot include yellowing leaves, mushy or dark-colored roots, and a foul odor emanating from the soil. The plant may also exhibit wilting or a general decline in overall health.
- Causes: Overwatering is the primary culprit behind root rot. Waterlogged soil deprives the roots of oxygen, leading to their decomposition. Poor drainage and compacted soil can exacerbate the problem.
- Solutions: Immediately remove the plant from the pot and trim away any mushy or dark-colored roots. Repot the plant in fresh, well-draining potting mix. Reduce watering frequency to allow the soil to dry out completely between waterings. Ensure proper drainage in the new pot.
Final Summary
In conclusion, cultivating a thriving spider plant involves a combination of understanding its needs and implementing the right care practices. By carefully considering factors like light, water, soil, and temperature, you can successfully nurture your spider plant, leading to a visually appealing and rewarding indoor garden. This guide provides a solid foundation for successfully caring for your spider plant, allowing you to enjoy its beauty and longevity.