Cultivating thriving indoor plants is a rewarding hobby that brings life and vibrancy to any home. This guide provides a comprehensive overview of essential care techniques, from light requirements and watering methods to soil composition and pest control. Understanding these crucial elements is key to nurturing healthy and beautiful indoor plant companions.
This guide delves into the specific needs of various plant types, offering practical advice and actionable steps for creating a thriving indoor garden. We will explore optimal light conditions, appropriate watering schedules, and the significance of proper soil and potting mixes. Furthermore, we’ll address crucial aspects like temperature and humidity, fertilization, and pest management. Ultimately, the goal is to equip you with the knowledge to cultivate your indoor plants to their full potential.
Light Requirements
Proper light exposure is crucial for the health and vibrancy of indoor plants. Insufficient or inconsistent light can lead to stunted growth, pale leaves, and overall weakened plant structure. Understanding the specific light requirements of each plant species is essential for successful indoor gardening.Optimal light conditions mimic the natural environment of the plant, promoting healthy growth and development.
This section will explore the diverse light needs of common indoor plants, highlighting the importance of consistent light exposure and presenting a visual guide to various indoor lighting options.
Light Needs of Common Indoor Plants
Understanding the light requirements of different plant species is key to ensuring their well-being. A variety of indoor plants thrive in different light conditions, ranging from bright, indirect light to low light environments. The table below provides a comparison of light needs for several popular indoor plants.
| Plant Name | Ideal Light Conditions | Examples of Light Sources |
|---|---|---|
| Snake Plant (Sansevieria trifasciata) | Tolerates low light, but thrives in bright indirect light. | Near a north-facing window, under a grow light with a cool white spectrum. |
| Pothos (Epipremnum aureum) | Prefers bright, indirect light; can tolerate low light but growth will be slower. | Near an east- or west-facing window, or under a grow light. |
| ZZ Plant (Zamioculcas zamiifolia) | Tolerates low light, but performs best in bright, indirect light. | Near a north-facing window, or under a grow light. |
| Spider Plant (Chlorophytum comosum) | Prefers bright, indirect light; can tolerate low light. | Near an east- or west-facing window, or under a grow light. |
| Peace Lily (Spathiphyllum) | Prefers bright, indirect light; can tolerate low light but flowering may be reduced. | Near an east- or west-facing window, or under a grow light with a balanced spectrum. |
Importance of Consistent Light Exposure
Consistent light exposure is vital for the health and development of indoor plants. Fluctuations in light intensity or duration can disrupt the plant’s natural growth cycle. Plants rely on a consistent light source to regulate photosynthesis, which fuels their growth and development.
Inconsistent light can lead to etiolation, a condition characterized by elongated stems and pale leaves, indicating a struggle to access adequate light. Similarly, insufficient light can hinder flowering and fruiting.
Indoor Lighting Options
A variety of indoor lighting options can supplement or enhance natural light for indoor plants. The appropriate choice depends on the specific needs of the plant and the available space. Here’s a visual guide to common indoor lighting options.
Visual Guide to Indoor Lighting for Plants
Imagine a series of light sources, each with its unique characteristics. This visual guide aims to illustrate the different types of indoor lighting, including their intensity and color spectrum, to help you choose the best option for your plants.
- Grow Lights: Grow lights are specifically designed to provide the necessary spectrum of light for plant growth. They typically offer high intensity and specific color wavelengths, crucial for photosynthesis. Examples include full spectrum grow lights, LED grow lights, and fluorescent grow lights. The intensity and spectrum of these lights can be adjusted to match different plant requirements.
- Fluorescent Lights: Fluorescent lights provide a broad spectrum of light, making them suitable for a variety of indoor plants. They offer a moderate light intensity, often suitable for plants that don’t require extremely bright conditions. These lights are relatively affordable and energy-efficient.
- LED Lights: LED lights are energy-efficient and offer adjustable color temperatures, allowing you to tailor the light spectrum to specific plant needs. Their intensity can vary greatly depending on the type and wattage of the LED light. The color spectrum of LED lights can also be tuned to match the light requirements of specific plants.
- Natural Light: Natural light is the ideal source for indoor plants. Positioning plants near windows allows them to access the full spectrum of sunlight. East and west-facing windows provide ideal morning and afternoon light, while south-facing windows offer the most intense light. North-facing windows provide the least intense light, suitable for plants that tolerate lower light conditions.
Watering Techniques
Proper watering is crucial for the health and vitality of indoor plants. It ensures adequate hydration without leading to overwatering, which can cause root rot. Understanding the specific needs of different plant types and employing appropriate watering methods are key to success.
Watering Methods
Different watering methods offer varying advantages and disadvantages. Choosing the right method depends on the plant’s specific requirements and the individual’s preferences.
- Top Watering: This method involves pouring water directly onto the soil surface. It is a straightforward technique suitable for many plants, especially those with well-drained soil. Advantages include its simplicity and ease of use. However, it can lead to water runoff, especially if not performed carefully. Surface water may not always reach the roots deep within the soil, potentially leaving some roots dry.
It is essential to monitor the water absorption rate and adjust accordingly.
- Bottom Watering: In bottom watering, the plant’s pot is placed in a tray of water. The water gradually soaks up through the drainage holes, hydrating the roots from below. This method minimizes water waste and helps to ensure even moisture distribution. It is particularly beneficial for plants that are susceptible to overwatering from top watering, and reduces the chance of water spots on leaves.
However, it requires more attention to ensure the water level in the tray is maintained correctly, and not too high, to avoid root rot. The amount of time the pot needs to be submerged can vary significantly depending on the plant type and the pot’s size.
- Self-Watering Pots: These pots are designed with reservoirs to hold water. The water slowly releases into the soil as needed, providing a consistent moisture level. Self-watering pots are ideal for busy individuals or those who may forget to water their plants regularly. The consistent moisture can lead to healthier growth for plants that prefer consistent moisture. However, they can be more expensive than traditional pots and require careful monitoring to avoid waterlogging.
Determining Watering Needs
Knowing when to water a plant is essential for its health. Consistent monitoring of the soil moisture level is key.
- Soil Moisture Check: A reliable method for determining watering needs is to feel the soil. Insert a finger about an inch into the soil. If the top inch of soil feels dry, it’s time to water. Alternatively, use a moisture meter to provide a precise measurement of the soil’s moisture content. A moisture meter provides a more scientific approach for consistent moisture control, enabling more accurate watering schedules.
This method ensures you are watering when needed, not too much, or too little.
Watering Needs of Different Plants
The watering needs of indoor plants vary considerably depending on their species and the specific growing conditions. A general guide is presented below.
| Plant Name | Watering Frequency | Soil Type Preference |
|---|---|---|
| Snake Plant (Sansevieria trifasciata) | Once every 2-3 weeks | Well-draining, sandy soil |
| ZZ Plant (Zamioculcas zamiifolia) | Once every 4-6 weeks | Well-draining, gritty soil mix |
| Peace Lily (Spathiphyllum) | Once every 1-2 weeks | Moist but well-drained soil |
| Pothos (Epipremnum aureum) | Once every 7-10 days | Well-draining, airy soil |
Soil and Potting Mixes
 - wikiHow")
A crucial aspect of indoor plant care is understanding and selecting the right soil and potting mix. The composition of the medium significantly impacts the plant’s health, growth, and overall well-being. Choosing the correct soil and mix ensures optimal drainage, aeration, and nutrient retention, fostering healthy root development and vigorous growth.Proper soil and potting mixes support the roots’ respiration and prevent issues like root rot.
The right mix also aids in retaining moisture while allowing for adequate drainage, creating an environment where your plants can thrive. Different plants have specific needs, so tailoring the mix to their requirements is essential for successful indoor gardening.
Ideal Soil Composition for Different Plants
Different indoor plants have varying soil preferences. Understanding these preferences allows for a more tailored approach to care. Succulents, for instance, thrive in well-draining soil, while ferns often prefer a consistently moist environment. The soil’s texture and structure play a significant role in maintaining these different moisture levels.
- Succulents and cacti require a very porous and well-draining mix to prevent waterlogging. A mix with a high proportion of coarse materials like perlite or sand is ideal.
- Ferns and other moisture-loving plants benefit from a mix that retains moisture without becoming waterlogged. Peat moss or coco coir can be incorporated to achieve this balance.
- Most flowering plants and leafy greens often benefit from a balanced mix that combines drainage with moisture retention. A mix with a balanced proportion of potting soil, peat moss, perlite, and vermiculite is often a good starting point.
Selecting Appropriate Potting Mixes
Choosing the right potting mix is crucial for the success of your indoor plants. The selection should align with the specific needs of the plant species, considering factors such as drainage and aeration. This ensures the plant’s roots can breathe and absorb nutrients effectively.
- Drainage: Proper drainage is paramount. A mix with sufficient drainage prevents water from accumulating around the roots, mitigating the risk of root rot. Components like perlite, vermiculite, or coarse sand contribute significantly to drainage.
- Aeration: Adequate aeration allows for oxygen exchange within the soil, vital for root health. Well-aerated mixes contain elements like perlite, coarse bark, or gravel, which provide spaces for air circulation.
- Nutrient Content: While the potting mix doesn’t provide all the nutrients, a balanced mix offers a good starting point. You can supplement with slow-release fertilizers or liquid feeds as needed.
Creating Your Own Potting Mix
Creating your own potting mix allows for greater control over the soil composition and its specific needs for your plants. This can lead to better growth and health for your plants.A balanced homemade potting mix is a great way to control the ingredients and the proportion of each. A common ratio is 1 part peat moss or coco coir, 1 part perlite, and 1 part potting soil.
| Component | Description | Ratio (Example) |
|---|---|---|
| Potting Soil | Provides essential nutrients and structure. | 1 part |
| Peat Moss or Coco Coir | Excellent moisture retention and aeration. | 1 part |
| Perlite or Vermiculite | Promotes drainage and aeration. | 1 part |
| Coarse Sand or Bark | (Optional) Further improves drainage. | (0.5-1 part) |
A well-structured potting mix is vital for the health of your indoor plants. Adjusting the ratios based on the specific needs of your plant species is essential.
Temperature and Humidity
Maintaining optimal temperature and humidity levels is crucial for the health and well-being of indoor plants. These factors directly influence their growth rate, overall vigor, and susceptibility to various issues. Understanding the specific needs of different plant types is key to providing them with the ideal environment for thriving.Temperature and humidity levels, along with proper light and watering, are fundamental elements of successful indoor plant care.
These factors directly affect the plant’s physiological processes, influencing everything from photosynthesis and respiration to nutrient uptake and overall health.
Ideal Temperature Ranges for Common Indoor Plants
Understanding the ideal temperature range for each plant species helps prevent stress and promotes healthy growth. Different plants have different temperature tolerances. Some thrive in cooler temperatures, while others prefer warmer conditions.
- Tropical Plants: Many tropical plants, such as ferns, orchids, and palms, flourish in a relatively consistent warm environment. A general range is 65-85°F (18-29°C). Fluctuations beyond this range can negatively impact their health.
- Subtropical Plants: Plants originating from subtropical climates, like hibiscus and some citrus varieties, appreciate temperatures that fall within a range of 70-85°F (21-29°C). They can tolerate slightly cooler temperatures but extended periods of cold can harm them.
- Mediterranean Plants: Plants adapted to Mediterranean climates, such as succulents and some cacti, generally prefer warmer temperatures. A temperature range of 70-90°F (21-32°C) is ideal. Exposure to temperatures below 50°F (10°C) should be avoided.
- Cool-Season Plants: Some indoor plants, such as African violets and some herbs, perform best in cooler temperatures. A range of 60-75°F (15-24°C) is often suitable. Excessively warm conditions can lead to stress and inhibit their growth.
Importance of Maintaining Proper Humidity Levels
Maintaining appropriate humidity levels is vital for the health of many indoor plants. Low humidity can lead to dryness, impacting leaf health and potentially causing pests or diseases.
Proper humidity levels can significantly affect a plant’s ability to retain moisture, influencing its overall health and vitality. Consistent moisture levels prevent leaf drop and maintain a healthy environment conducive to growth.
Measuring and Adjusting Humidity
Measuring humidity is a critical step in providing the right environment for your plants. Several methods exist for determining humidity levels.
- Humidity Meter: A simple and accurate way to measure humidity is with a digital or analog humidity meter. These devices provide a direct reading of the relative humidity in a given area. These are available at most garden centers and online retailers.
- Visual Observation: Observe the plants for signs of stress. Crispy, dry leaf tips or curled leaves can indicate low humidity.
Methods for Increasing Humidity
Increasing humidity levels can be achieved through various methods. These approaches create a more favorable environment for your indoor plants.
- Humidifiers: Humidifiers are devices that introduce moisture into the air. Different types of humidifiers exist, from ultrasonic to evaporative models. These can significantly increase humidity levels in the surrounding environment.
- Pebble Trays: Place a tray of water with pebbles beneath the plant pots. The water evaporates, increasing humidity around the plants. This method is relatively low-maintenance, but regular checks of the water level are essential.
- Grouping Plants: Group plants together. This naturally increases the humidity around the plants. The increased moisture created by the collective evaporation helps to maintain a more favorable environment.
Fertilizing
Providing the proper nutrients is crucial for the healthy growth and vibrant appearance of indoor plants. A well-balanced fertilization schedule can promote robust root development, lush foliage, and abundant blooms. Understanding the types of fertilizers, application methods, and optimal fertilization times will ensure your plants thrive in their indoor environment.
Different Types of Fertilizers
A variety of fertilizers are available for indoor plants, each with its own composition and application characteristics. Choosing the right type depends on the specific needs of your plants and your preferences.
| Fertilizer Type | Nutrient Content | Application Methods | Frequency |
|---|---|---|---|
| Liquid Fertilizers | Usually formulated with a balanced blend of nitrogen (N), phosphorus (P), and potassium (K), often with micronutrients. | Diluted in water and applied directly to the soil or foliage. | Typically every 2-4 weeks during the growing season. |
| Granular Fertilizers | Also provide a balanced blend of NPK, but in a slow-release form. | Scattered around the base of the plant and incorporated into the soil. | Application frequency varies depending on the product, generally every 4-8 weeks. |
| Organic Fertilizers | Derived from natural sources like compost, manure, or seaweed, rich in micronutrients and organic matter. | Applied to the soil, often mixed with potting soil or used as a top dressing. | Generally applied less frequently than chemical fertilizers, often every 6-8 weeks or even less. |
Balanced Fertilization
Balanced fertilization, where the plant receives an appropriate ratio of essential nutrients, is vital for healthy growth. An imbalance in nutrient levels can lead to deficiencies or excesses, affecting the plant’s overall health and aesthetics.
A balanced fertilizer ensures that the plant receives the correct amounts of nutrients for optimal growth and development.
Consequences of Over- and Under-Fertilizing
Over-fertilizing can lead to nutrient burn, causing leaf discoloration, yellowing, and even leaf drop. Under-fertilizing results in stunted growth, pale foliage, and decreased flowering. Both conditions negatively impact the plant’s vitality.
Optimal Fertilization Time and Schedule
The ideal time to fertilize indoor plants is during their active growth periods, typically spring and summer. This aligns with the increased metabolic activity of the plants. A consistent fertilization schedule, tailored to the specific fertilizer type and plant species, is crucial for optimal results.
Identifying Nutrient Deficiencies
Observing the visual cues of your plants can reveal nutrient deficiencies. Yellowing leaves, stunted growth, or unusual leaf coloration may indicate a nutrient deficiency. Consult resources specific to your plant species to identify the precise nutrient lacking.
Pest and Disease Control
Maintaining the health of indoor plants often involves vigilance against pests and diseases. Understanding the common culprits and their telltale signs is crucial for timely intervention and preventing widespread damage. Proper identification and treatment strategies can significantly contribute to the long-term well-being of your indoor plant collection.
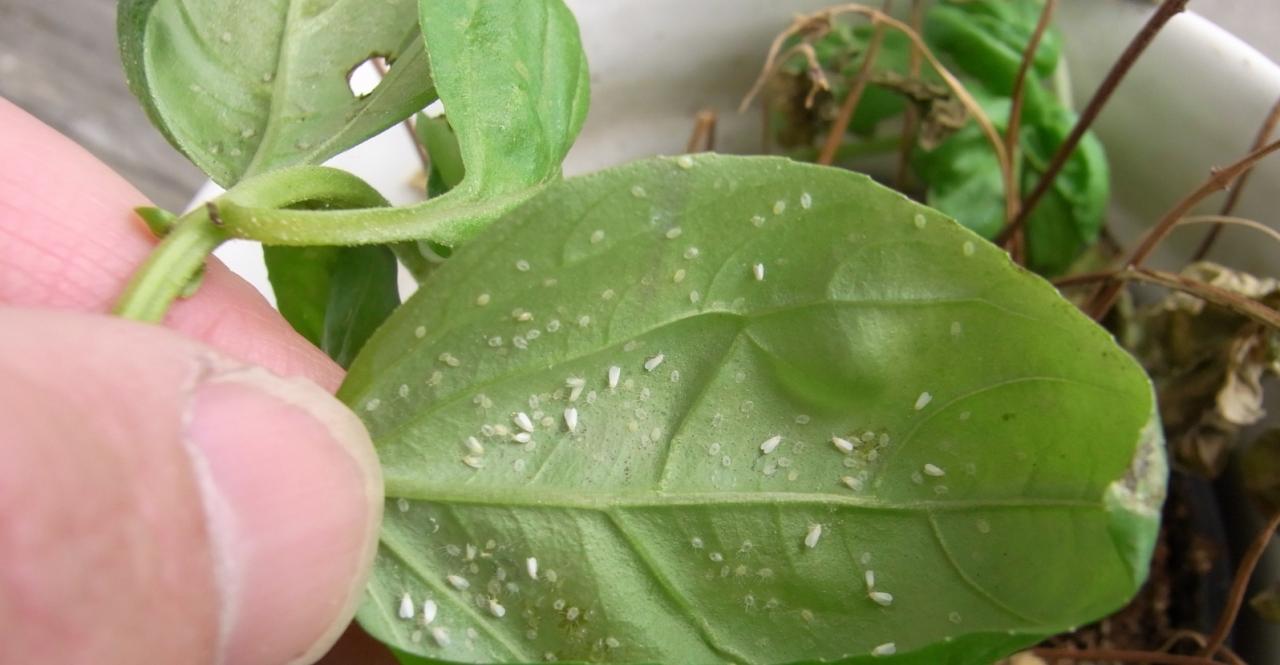
Common Indoor Plant Pests
Various pests can infest indoor plants, impacting their health and aesthetic appeal. Identifying these pests early is vital for effective treatment. Early detection minimizes the potential for widespread infestations.
- Aphids: These tiny, soft-bodied insects often appear in clusters on new growth, stems, and leaves. They suck sap from the plant, causing distortion and yellowing. They are often light green, black, or brown and can be found in dense groups. They may also excrete a sticky substance called honeydew, which can attract sooty mold.
- Spider mites: These minute arachnids spin fine webs, particularly on the undersides of leaves. They also cause stippling or discoloration of the leaves, leading to a mottled or stippled appearance. These tiny pests can be difficult to see without magnification, and their presence is often signaled by the fine webs they create.
- Mealybugs: These pests have a cottony or powdery appearance, often found on stems, leaves, and in the crevices of plants. They feed on plant sap, causing leaf yellowing and stunted growth. They can be various colors including white, light pink, or gray.
- Scale insects: These immobile insects have a hard, shell-like covering. They feed on plant sap, leading to stunted growth and leaf yellowing. They often appear as small, raised bumps or patches on the leaves or stems, with varying colors like brown, black, or light gray.
Identifying and Treating Plant Diseases
Plant diseases can manifest in various ways, from leaf spots to root rot. Early detection is key for successful treatment.
- Leaf spots: These appear as circular or irregular spots on leaves. They can be various colors, from brown to yellow, and may have a distinct border. The spots are typically caused by fungal infections or bacterial issues. Appropriate fungicides may be required.
- Root rot: Overwatering is a common cause of root rot, leading to a mushy, dark discoloration of the roots. The plant may exhibit wilting, yellowing, and eventual death. Repotting with fresh, well-draining soil is often a necessary step, along with adjusting watering practices.
- Fungal diseases: These infections often manifest as powdery mildew, characterized by a white or gray powdery coating on leaves and stems. This disease can be caused by environmental conditions, and proper ventilation and reduced humidity can help prevent further spread.
Pest Control Methods Comparison
Choosing the right pest control method depends on the severity of the infestation and the plant’s sensitivity.
| Method | Description | Advantages | Disadvantages |
|---|---|---|---|
| Natural Treatments (e.g., insecticidal soap, neem oil) | Environmentally friendly solutions derived from natural sources. | Safe for plants and beneficial insects, minimal environmental impact. | Often less effective against severe infestations, may require repeated applications. |
| Chemical Treatments (e.g., pesticides) | Synthetic solutions specifically designed to kill pests. | Highly effective against severe infestations, often quick-acting. | Potentially harmful to plants and beneficial insects, may leave residue, environmental concerns. |
| Cultural Practices (e.g., proper watering, good sanitation) | Preventative measures that reduce the likelihood of pest or disease problems. | Cost-effective, environmentally friendly, long-term preventative measures. | May not be sufficient for severe infestations, requires consistent maintenance. |
Propagation Methods

Propagating indoor plants allows you to create new plants from existing ones, expanding your collection or sharing them with others. This process often mimics natural reproduction, but with careful attention to the environment and the specific needs of each plant type. Understanding different propagation methods is key to successful plant growth and the joy of seeing your collection flourish.
Methods of Propagation
Different methods of propagation suit various plant types and offer varying degrees of difficulty and success. Each approach has unique requirements and steps, and understanding these distinctions will greatly impact the outcome.
- Cuttings: This method involves taking a piece of the parent plant, called a cutting, and encouraging it to develop roots and grow into a new plant. This method is frequently used for plants with stems or leaves that can be easily detached and rooted. Stem cuttings are commonly taken from the tips of stems, while leaf cuttings involve separating a leaf from the plant.
- Division: This technique is particularly useful for plants that naturally produce multiple stems or plants from a single root system. By carefully separating the plant into multiple sections, each with its own roots and shoots, you create new, independent plants. This is a straightforward approach, often yielding quick results. Examples include spider plants and some succulents.
- Layering: This method involves encouraging a stem to root while still attached to the parent plant. The stem is bent down and buried in the soil, allowing it to develop roots before being separated. This method works well for plants that have flexible stems and a propensity to develop roots from contact with the soil. It’s frequently used for plants like jasmine and some types of roses.
Success Rates and Ease of Propagation
The success rate of a propagation method depends on factors like the plant type, the health of the parent plant, and the environment. Different methods vary in their ease of execution, with some requiring more technical expertise than others.
- Cuttings generally have a high success rate when proper techniques are employed. Success depends heavily on the selection of a healthy, actively growing cutting and proper care in the rooting environment.
- Division often yields high success rates, particularly with plants that are naturally inclined to form multiple plants from a single root system. Careful division of the root ball is essential for preventing damage to the roots.
- Layering success rates can be influenced by the plant type’s responsiveness to the technique and the specific environmental conditions. The success rate depends on factors such as the plant’s growth habit and the ability of the stem to form roots while still connected to the parent plant.
Choosing the Right Propagation Method
The optimal propagation method for a specific plant depends on its growth characteristics and how readily it responds to the various techniques. Consider the plant’s type and its natural growth pattern.
| Plant Type | Recommended Propagation Method | Reasoning |
|---|---|---|
| Spider Plant | Division | Spider plants readily produce offsets or “spiderettes” from their parent plant, making division a straightforward and effective propagation method. |
| Rose | Layering | Layering is suitable for roses due to their propensity to develop roots from contact with the soil. |
| African Violet | Leaf Cuttings | Leaf cuttings are a common and effective propagation method for African violets, given their ability to develop roots from leaf segments. |
Plant Selection and Placement
Choosing the right indoor plants can significantly enhance the aesthetic appeal and well-being of your home. Careful consideration of your personal preferences, available space, and the specific light conditions in various rooms will lead to a thriving indoor jungle. This section will guide you through selecting plants suitable for your home environment.
Choosing Plants Based on Preferences and Space
Different individuals have varying tastes in plant aesthetics. Some may prefer the lush foliage of ferns, while others might gravitate towards the striking blooms of orchids. Consider your personal preferences when selecting plants, ensuring they align with the overall décor and ambiance of your home. Small spaces may benefit from compact, low-growing varieties, while larger areas can accommodate more substantial plants.
The size of the mature plant should be factored into the available space.
Optimizing Light Exposure for Different Plants
Natural light is crucial for indoor plant health. Plants with varying light requirements thrive in different parts of the home. Plants requiring bright, indirect light, like pothos or spider plants, can be placed near a window with sheer curtains or a translucent screen to diffuse harsh sunlight. Low-light plants, such as ZZ plants or peace lilies, are better suited for areas further from windows or those with limited direct sunlight.
Plant Placement in Relation to Natural Light Sources
Sunlight intensity and duration significantly influence plant growth and health. For instance, plants accustomed to bright, indirect light may exhibit signs of stress if placed in low-light areas. Conversely, plants needing low light can suffer from leaf burn or stunted growth if placed in direct sunlight. Carefully consider the placement of plants in relation to windows and the amount of natural light available.
Easy-to-Care-for Indoor Plants
Selecting low-maintenance plants can make your indoor gardening journey more enjoyable. These plants often require less frequent watering and are more forgiving of occasional mistakes. Here’s a list of relatively easy-to-care-for indoor plants:
- ZZ Plant (Zamioculcas zamiifolia): This resilient plant tolerates low light conditions and infrequent watering, making it perfect for forgetful gardeners. It’s known for its striking, dark green foliage.
- Snake Plant (Sansevieria trifasciata): Known for its air-purifying qualities, snake plants are exceptionally adaptable to various light conditions. They can thrive in low-light environments and require minimal watering.
- Cast Iron Plant (Aspidistra elatior): This plant’s common name reflects its hardiness and tolerance for a wide range of conditions. Cast iron plants are excellent choices for beginners.
- Pothos (Epipremnum aureum): With its cascading vines and various variegated forms, pothos is a popular choice for hanging baskets or trellises. They are relatively easy to care for and can tolerate low-to-medium light conditions.
Troubleshooting Common Problems
Maintaining the health of your indoor plants requires vigilance and a keen eye for potential issues. Understanding the common problems and their causes is crucial for providing timely and effective solutions. Recognizing these problems early can prevent them from escalating into more significant issues, ensuring your plants thrive.Troubleshooting indoor plant problems involves identifying the symptoms, considering potential causes, and implementing appropriate solutions.
By understanding the relationship between environmental factors, plant needs, and observed symptoms, you can effectively address problems and maintain the well-being of your indoor greenery.
Yellowing Leaves
Yellowing leaves are a common symptom indicating a variety of potential issues. Factors like improper watering, nutrient deficiencies, or light stress can contribute to this problem. It’s essential to carefully evaluate the overall health of the plant and the environmental conditions to pinpoint the specific cause.
- Insufficient Light: If the leaves are consistently yellowing, particularly on lower leaves, insufficient light is a likely culprit. Moving the plant to a brighter location, while gradually acclimating it, can often resolve the issue. Providing supplemental grow lights might also be necessary.
- Overwatering or Underwaterings: Overwatering can lead to root rot, causing yellowing leaves. Underwatering, on the other hand, can lead to wilting and yellowing leaves as well. Ensure appropriate watering schedules based on the plant’s specific needs. Using a moisture meter can aid in determining the ideal soil moisture level.
- Nutrient Deficiencies: A lack of essential nutrients, such as nitrogen or iron, can manifest as yellowing leaves. Providing a balanced fertilizer formulated for indoor plants can help rectify this deficiency. Regular soil testing can identify specific nutrient needs.
Wilting
Wilting, characterized by drooping leaves and stems, is often indicative of insufficient water or excessive heat. Understanding the specific conditions contributing to wilting is crucial for successful recovery.
- Insufficient Water: The most common cause of wilting is insufficient watering. The plant is not receiving enough moisture to support its needs. Check the soil moisture regularly and water deeply when the top inch of soil feels dry.
- Overexposure to Heat: High temperatures can cause plants to lose water rapidly through transpiration, resulting in wilting. Ensure the plant is placed in a location with adequate air circulation and consider providing supplemental humidity.
- Root Problems: Root rot, often a result of overwatering, can also cause wilting. Inspect the roots for signs of rot. If root rot is present, repotting the plant in fresh potting mix is often necessary.
Pests
Various pests can infest indoor plants, causing damage to leaves and stems. Identifying the pest and employing appropriate control methods is vital.
- Spider Mites: Tiny spider mites can cause stippling or webbing on leaves. They can be controlled with insecticidal soap or neem oil, applied according to the product instructions. Maintain good air circulation to discourage pest infestations.
- Mealybugs: Mealybugs appear as small, white, cottony masses on stems and leaves. Remove visible pests manually, and use insecticidal soap or neem oil as a preventative measure. Isolate the affected plant to prevent further spread.
- Aphids: Aphids are small, sap-sucking insects that can cause yellowing or curling leaves. Regular inspection and treatment with insecticidal soap or horticultural oil are effective.
Troubleshooting Table
| Problem | Potential Causes | Solutions |
|---|---|---|
| Yellowing Leaves | Insufficient light, overwatering/underwatering, nutrient deficiencies | Adjust light exposure, improve watering schedule, use balanced fertilizer, soil testing |
| Wilting | Insufficient water, overexposure to heat, root problems | Deep watering, move to a cooler location, repot with fresh soil |
| Pests (e.g., spider mites, mealybugs, aphids) | Poor air circulation, environmental stress | Regular inspection, insecticidal soap/neem oil, isolate affected plants |
Conclusive Thoughts

In conclusion, this comprehensive guide provides a detailed roadmap for nurturing your indoor plants to optimal health and beauty. By understanding their specific needs – from light and water to soil and temperature – you can cultivate thriving green companions that add a touch of nature to your home. Remember, consistent care and attention to detail are key to successful indoor gardening.
We hope this guide has been informative and empowering.